The State of Play
For years, 4-bit quantization has been a game of compromises. We lived in a world of weight-only INT4 schemes – clever hacks like AWQ or AutoRound that compressed the model on disk but forced a costly dequantization step for every single forward pass. The weights were small, but the math was slow, always happening in a higher precision like FP16. We paid a constant dequantization tax, a performance ceiling imposed by the need to translate back to a format the silicon actually understood for computation.
Blackwell changes the physics of this game. NVIDIA’s NVFP4 is a hardware-native instruction. The Tensor Cores are built to ingest and compute on 4-bit floating-point numbers directly. This means we can finally quantize both weights and activations (W4A4) and keep the entire pipeline in low precision, eliminating the tax.
If you have Blackwell hardware, clinging to weight-only INT4 is like owning a race car and only ever driving it in first gear. The real throughput lies in native 4-bit execution, and NVFP4 is the key.
Why NVFP4, Why Now?
Blackwell elevates FP4 to first-class status. The entire stack – the Transformer Engine, TensorRT-LLM, and runtimes like vLLM – is now engineered around NVFP4 as the canonical 4-bit format. This matters for two reasons, and they are not subtle:
- Throughput: By keeping weights and activations in FP4 and executing matrix multiplications natively, you sidestep the dequantize-compute-requantize shuffle. The data stays compressed, the math stays fast. This is where the 2x+ performance gains materialize.
- Accuracy: Early FP4 attempts were brittle. NVFP4’s dual-scaling mechanism, however, allows it to maintain precision surprisingly close to FP8 for large models. The accuracy cliff that once made sub-8-bit formats a risky bet has become a manageable trade-off.
If you are running on Blackwell architecture (GeForce RTX 50-series, B200, Blackwell Ultra), NVFP4 is the most direct path to maximum 4-bit performance. The old ways are now legacy.
The Anatomy of the Format
- Data type for values: E2M1 (1 sign, 2-bit exponent, 1-bit mantissa) – brutally compact.
- Micro-block scale: FP8 E4M3 shared per block of 16 values.
- Tensor scale: FP32 shared across the entire tensor.
The reconstructed value for an element  is a product of these three components:

where  is the raw E2M1 value. This two-level scaling is the clever part. It uses the per-block FP8 scale to handle local precision and the tensor-level FP32 scale to manage the global dynamic range. It’s a pragmatic balance between granularity and overhead.
The True Cost: More Than 4.00 Bits
NVFP4 isn’t “free.” The scales add overhead. For a block of 16 values:
- 16 × 4-bit values = 64 bits
- 1 × 8-bit FP8 scale = 8 bits
- The FP32 tensor scale is amortized to near-zero across millions of values.
The effective cost is  bits per value. This is the price of admission for a format that enables native computation and preserves accuracy. It’s slightly larger than a pure INT4 representation, but you’re buying back throughput, not just saving disk space.
NVFP4 vs. The Old Guard (MXFP4, INT4)
The landscape of 4-bit is littered with trade-offs. Here’s how they stack up.
| Aspect | NVFP4 | MXFP4 | INT4 (AWQ/AutoRound etc.) |
|---|---|---|---|
| Value format | FP4 (E2M1) | FP4 (E2M1) | Integer 4-bit |
| Block size | 16 | 32 | Typically 128 (per-group) |
| Per-block scale | FP8 E4M3 | Coarser; fewer scale options | Per-group INT scale |
| Tensor scale | FP32 | Varies | Not typical (weight-only) |
| Activations | W4A4 is the entire point | Possible, format-dependent | Often A16 (weight-only) |
| Math on Blackwell | Native FP4 | Not the accelerated path | Computed in higher precision |
| The Bottom Line | Highest throughput on Blackwell, FP8-like accuracy on large models | Lower accuracy vs. NVFP4 | Great compression; speed hobbled by dequant tax |
The principle is simple: If your hardware is Blackwell and you can quantize activations without unacceptable accuracy loss, NVFP4 will demolish INT4 pipelines on throughput. It’s not a fair fight.
The Toolkit
- Quantization: LLM Compressor (recipes for NVFP4 W4A4 and the slower W4A16 variant).
- Serving: vLLM (build from source for the latest Blackwell support), TensorRT-LLM (optimized NVFP4 kernels).
- Hardware: Blackwell / Blackwell Ultra Transformer Engine. The 5th-gen Tensor Cores are what make this possible. See NVIDIA’s overviews: NVFP4 intro, NVFP4 details.
Hands-on: Forging NVFP4 Artifacts
Here is a straightforward recipe for producing both W4A4 and W4A16 NVFP4 models using LLM Compressor. This assumes a Blackwell GPU with enough VRAM for your target model.
# 1. Environment Setup
pip install --upgrade pip setuptools wheel
pip install llmcompressor datasets accelerate transformers safetensors

# Optional but recommended: pin torch to a version compatible with your CUDA toolkit
# pip install torch==<version> --index-url https://download.pytorch.org/whl/cu<your_cuda_version>
# 2. Load Model and Prepare a Calibration Set
# The quality of your calibration data matters more than the quantity.
from transformers import AutoModelForCausalLM, AutoTokenizer
from datasets import load_dataset
MODEL_ID = "meta-llama/Llama-3.3-70B-Instruct"
MAX_SEQ_LEN = 2048 # Use long sequences. Short snippets won't calibrate attention blocks correctly.
NUM_CAL_SAMPLES = 512 # 128 is often enough if the sequences are long and diverse.
model = AutoModelForCausalLM.from_pretrained(MODEL_ID, torch_dtype="auto")
tokenizer = AutoTokenizer.from_pretrained(MODEL_ID)
# Use a dataset that mirrors your target domain's structure. Chat data for chat models.
raw_dataset = load_dataset("HuggingFaceH4/ultrachat_200k", split=f"train_sft[:{NUM_CAL_SAMPLES}]").shuffle(seed=42)
def format_as_text(example):
return {"text": tokenizer.apply_chat_template(example["messages"], tokenize=False)}
cal_dataset_text = raw_dataset.map(format_as_text)
def tokenize_function(sample):
return tokenizer(
sample["text"], padding=False, truncation=True,
max_length=MAX_SEQ_LEN, add_special_tokens=False
)
cal_dataset_tokenized = cal_dataset_text.map(tokenize_function, remove_columns=cal_dataset_text.column_names)# 3. One-Shot Quantization to NVFP4 W4A4
from llmcompressor.modifiers import QuantizationModifier
from llmcompressor import oneshot
# This recipe targets linear layers for W4A4 quantization.
# Always ignore the lm_head unless you have a specific reason not to.
w4a4_recipe = QuantizationModifier(
targets="Linear",
scheme="NVFP4",
ignore=["lm_head"],
)
oneshot(
model=model,
dataset=cal_dataset_tokenized,
recipe=w4a4_recipe,
max_seq_length=MAX_SEQ_LEN,
num_calibration_samples=NUM_CAL_SAMPLES,
)
model.save_pretrained("./llama33-70b-nvfp4-w4a4")# 4. (Optional) Create a W4A16 Baseline
# This is for comparison. It will be much slower at inference.
w4a16_recipe = QuantizationModifier(targets="Linear", scheme="NVFP4A16", ignore=["lm_head"])
oneshot(model=model, recipe=w4a16_recipe, dataset=cal_dataset_tokenized, max_seq_length=MAX_SEQ_LEN)
model.save_pretrained("./llama33-70b-nvfp4-w4a16")Lessons from the Trenches:
- Calibrate on long sequences (≥2k tokens). A small set of long, diverse samples is superior to thousands of short, repetitive ones. You are teaching the quantizer about activation distributions during complex attention patterns, not just simple token generation.
- Always protect
lm_head. Quantizing the final output layer is a common source of catastrophic quality degradation. Leave it in high precision. - Quality over quantity. 256 well-chosen, long calibration samples will yield a better model than 4096 random short ones.
Serving with NVFP4
vLLM
On the bleeding edge, you build from source. That’s the price for being first. While pre-built wheels will eventually catch up, compiling vLLM against your specific Blackwell drivers and CUDA toolkit is the most reliable path.
# Build vLLM from source (conceptual sketch)
# 1. Ensure your Blackwell drivers and CUDA toolkit (sm_120+) are installed.

# 2. Install build dependencies
pip install setuptools_scm
pip install -r https://raw.githubusercontent.com/vllm-project/vllm/main/requirements/build.txt

# 3. Clone and build
git clone https://github.com/vllm-project/vllm.git
cd vllm
MAX_JOBS=8 python setup.py develop
# Launch the OpenAI-compatible server
python -m vllm.entrypoints.openai.api_server \
--model ./llama33-70b-nvfp4-w4a4 \
--dtype auto \
--max-model-len 32768 \
--kv-cache-dtype fp4 # Keep the KV cache in low-precisionNotes:
- If you encounter instability, check for conflicts with third-party kernels like specific FlashAttention builds. NVFP4 support is new, and the ecosystem is catching up.
- Verify your logs to ensure NVFP4 kernels are actually being loaded. A silent fallback to dequantization will kill your performance.
TensorRT-LLM
For production deployments where every ounce of throughput matters, building a dedicated NVFP4 engine with TensorRT-LLM is the way to go. This gives you maximum control and performance. The process is more involved but yields the best results.
- Project: TensorRT-LLM on GitHub
- Guidance: NVIDIA Developer: NVFP4 overview
What to Expect: The Payoff
Accuracy
For large models (70B+), NVFP4 W4A4 tracks FP8 performance on standard benchmarks with a delta often less than 1%. Smaller models (<10B) are more sensitive; they might require hybrid recipes where sensitive layers (like attention outputs) are kept in FP8 while the rest moves to NVFP4.
Memory
The model’s working set will be roughly 3.5× smaller than FP16 and 1.8× smaller than FP8. This is a significant win for colocation and running larger models on single GPUs.
Throughput
This is the main event. On Blackwell, a well-tuned NVFP4 W4A4 pipeline can deliver ~2× or more tokens/sec compared to an optimized INT4 weight-only baseline. The NVFP4A16 variant, by contrast, gives up most of this gain because it still pays the dequantization tax for activations.
The core lesson is simple: if you’re not quantizing activations to FP4, you are leaving the majority of the performance on the table. It’s a rookie mistake.
A Simple Throughput Harness
# Measure tokens/sec against a local vLLM server
import time, requests, statistics

URL = "http://localhost:8000/v1/chat/completions"
PAYLOAD = {
  "model": "local-nvfp4-model",
  "messages": [{"role": "user", "content": "Write a short story about an AI that discovers the concept of boredom."}],
  "temperature": 0.0,
  "max_tokens": 512
}
NUM_REQUESTS = 10

latencies = []
for _ in range(NUM_REQUESTS):
    start_time = time.monotonic()
    response = requests.post(URL, json=PAYLOAD, timeout=120)
    response.raise_for_status()
    end_time = time.monotonic()
    latencies.append(end_time - start_time)

avg_latency = statistics.mean(latencies)
p90_latency = sorted(latencies)[int(0.9 * NUM_REQUESTS) - 1]

print({
  "p50_latency_s": statistics.median(latencies),
  "p90_latency_s": p90_latency,
  "avg_latency_s": avg_latency,
  "avg_tok_per_s": PAYLOAD["max_tokens"] / avg_latency
})
Run this against your NVFP4 W4A4 model and an INT4 AWQ (W4A16) model. The difference will not be subtle.
When Things Go Wrong
- Poor Performance: You left activations in FP16/FP8. The fix: Use a W4A4 recipe. If quality suffers on a smaller model, use a hybrid scheme, keeping only the most sensitive layers in a higher precision.
- Bad Accuracy: Your calibration data was bad. The fix: Use a small number of long (≥2k tokens), domain-relevant sequences.
- Kernel Mismatches: You’re not actually running native FP4. The fix: Update your serving framework to a Blackwell-native branch and check logs for fallback warnings.
- OOM During Quantization: You’re trying to load too much at once. The fix: Use Accelerate to stage the model across CPU and GPU memory and quantize in smaller chunks.
MXFP4 vs. NVFP4: The Engineering Details
While both formats use an E2M1 value encoding, NVFP4’s design is more robust for a few key reasons:
- Block size of 16 (vs. 32): Tighter blocks mean scales are more localized, better containing the impact of outliers.
- FP8 E4M3 scales: This provides finer-grained scaling factors than the power-of-two schemes sometimes used in MX, allowing for better representation of value distributions.
- Native Blackwell Kernels: This is the non-negotiable advantage. The hardware was built for NVFP4.
The result is a format that is more stable and, on the hardware it was designed for, much faster.
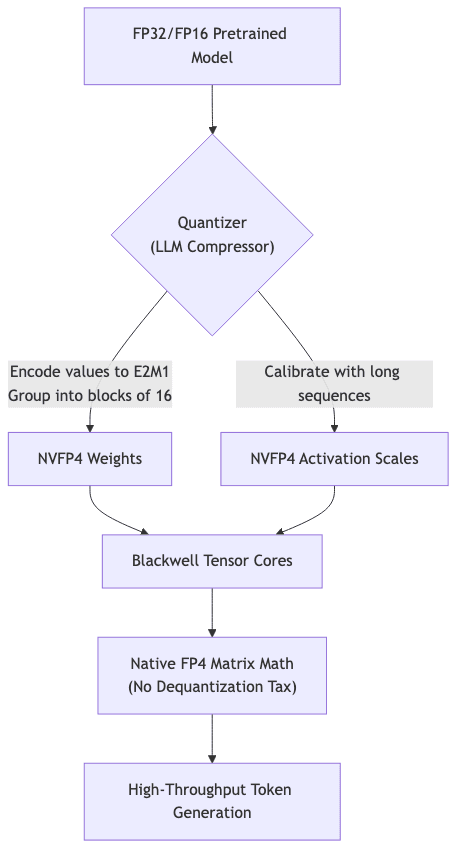
Mental Model: The NVFP4 Pipeline
Pre-Flight Checklist
Final Thoughts
NVFP4 is the first 4-bit format I can recommend without major caveats, but the conditions are strict: you must be on Blackwell, and you must quantize activations. Under those conditions, it delivers a step-change in performance that makes older INT4 schemes feel archaic. It’s fast, accurate enough for the largest models, and the tooling is mature enough for serious teams to adopt quickly.
If you’ve been living with the compromises of weight-only quantization, NVFP4 is your upgrade path. It’s the way to unlock what the hardware was built to do.
Further Reading